The Group Lighting Event System (F2 Mode)
|
Note: It is necessary to read through and learn the Basic/Static Event mode first, as it will teach you about the lane structure, fade and static event behaviour, placing different colours, brightness and more. These necessary basics will not be covered in this page. The Static Event System (F3 Mode) The Group Event 'Top view'When you first enter F2 Mode, the lane structure and visuals will look almost identical to the Basic event mode, the primary difference being the additional UI text just above the waveform that will take you to the different pages of lanes (the TAB key can be used to move through them, or you can simply click on them).
|
 The 'Top view' of the Group Lighting System. The Stars indicate the colour lanes and the circles indicate the rotation lanes. A single Group Event has been placed into a lane, which is why the group of lights in the preview in the background are lit up. The Red square is indicating what page of lanes you have currently selected.   For more detailed information on these control schemes, see Editor Control Scheme |
Colour Group Events, Event boxes and Group UI.
Any event that is placed down onto a lane when in the top view within the Group Lighting system, becomes what we call a Group event. A Group event can be 'opened up', where you can go inside it and reveal an individual lane and a new UI that allows you to create effects and change settings completely within that single group event.
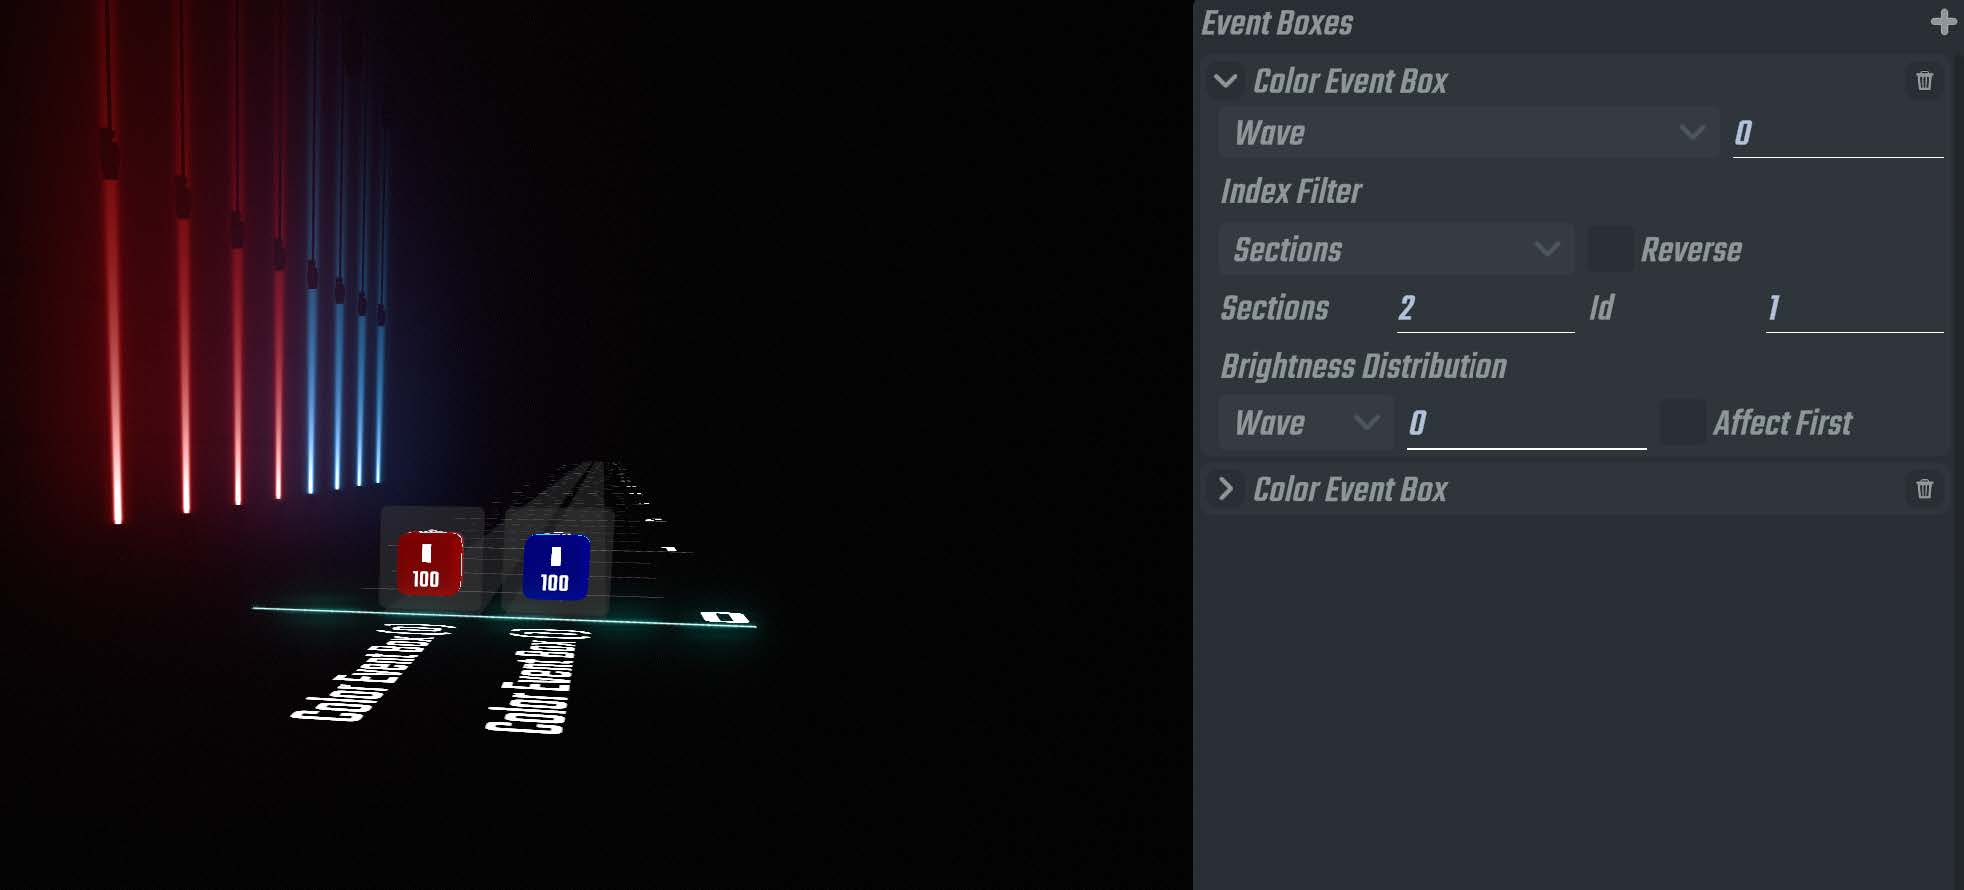
In the image to the right with the close-up 100 brightness, blue static block, we are now 'within' the group Block that is displayed in the top view. We know we are inside it because the UI to the right of the screen has now appeared.
Anything that is placed or changed in a group block will remain within that block, even if it is not visible in the top view of the group system.
To show this, i want you (whilst within this group event) to scroll a few beats ahead and place a red event.
Now, scroll back to the beat 0 whilst in the group event and click spacebar, you the lights in the background should change from blue, to red.
Now, again come back to beat 0, but now click the ESC key. You will return to the 'top view' (like the first image to the right), but you will still only see the blue block there. If you now click play by clicking spacebar, you will still see that the lights in the background will still be turning red. It’s best to try and visualise that group events are like folders, holding multiple (even hundreds) of events in itself.
I would recommend to play around with understanding how group events hold these events. Add a couple of group events in the top view, go into each one and place some events.
A group event itself visually looks like the first event that exists within it. What i mean by that for example is to place a new group event down, doesn't matter the colour or type. Once it's placed, go inside that group event, and then i want you to delete the event that's within it, so that there's nothing more inside.
If you now click ESC to return to the top view, you will notice the group event is now a blank grey box, that's because there's nothing inside.
Go back inside it by clicking on it, and placing a different event now than before, it doesn't even have to be on beat 0, try it on beat 1.
Now when you click ESC to exit out, that group event in the top view now looks like that event you placed within it. It is simply a visual for what the first event is that's within it.
Now let's explore more about the options within the Group UI View. To the image to the right we can see it split into three different areas. Duration, Index Filters and Brightness distribution.
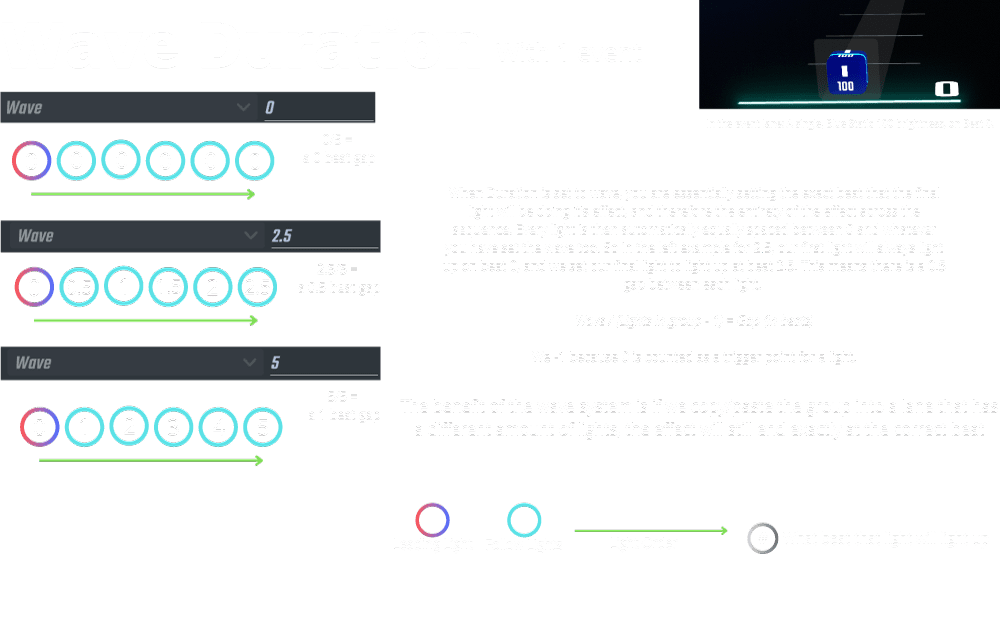
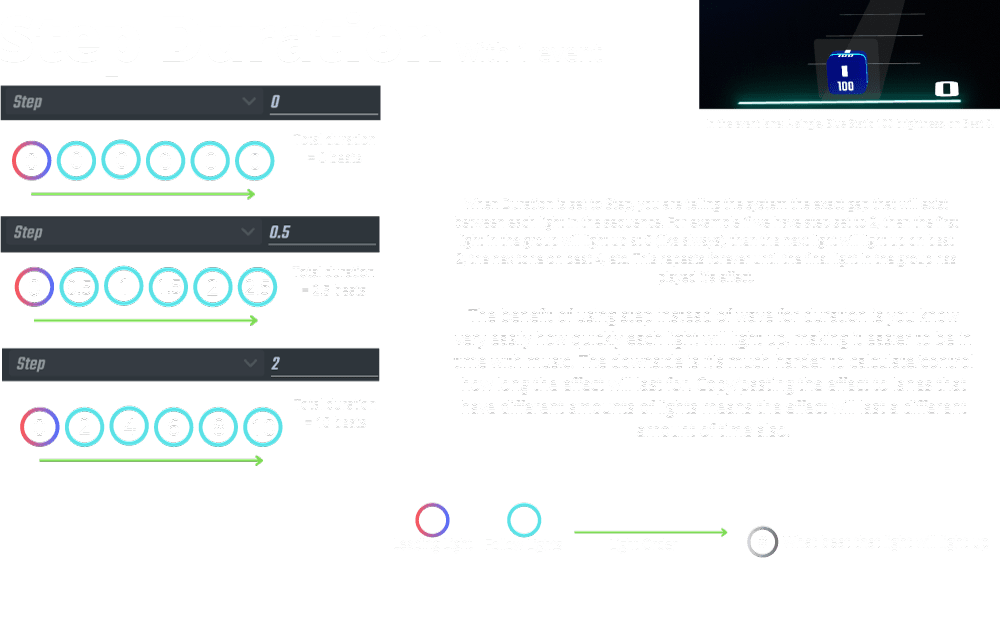
Duration allows us to play around with timings of when events display on each individual light in the group. By default the duration is set to 0, meaning there is no gap or time difference between any lights in the group, so all lights in the group will look identical with any lighting events displayed on them.
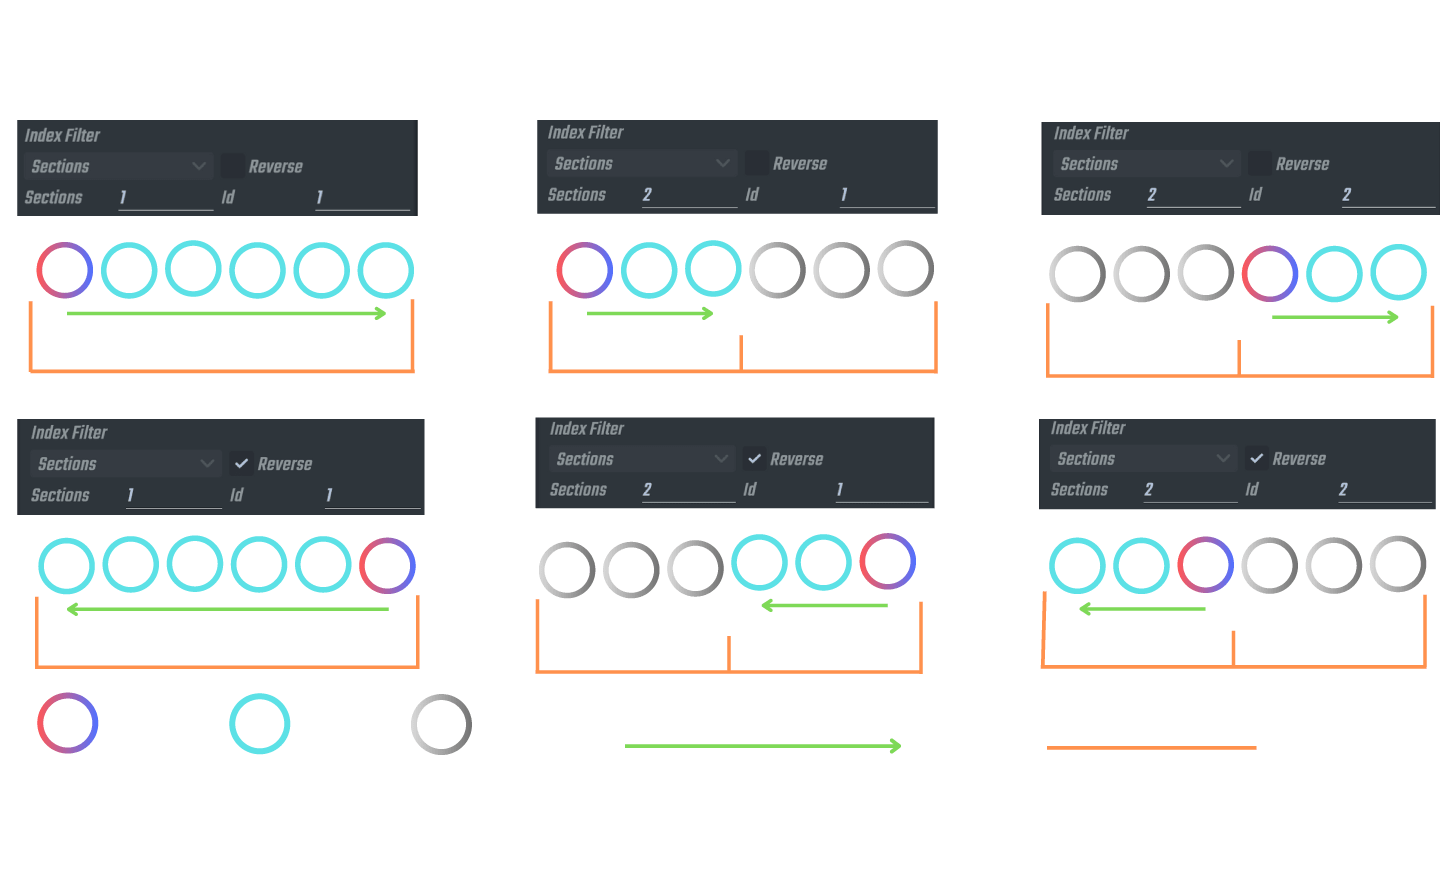
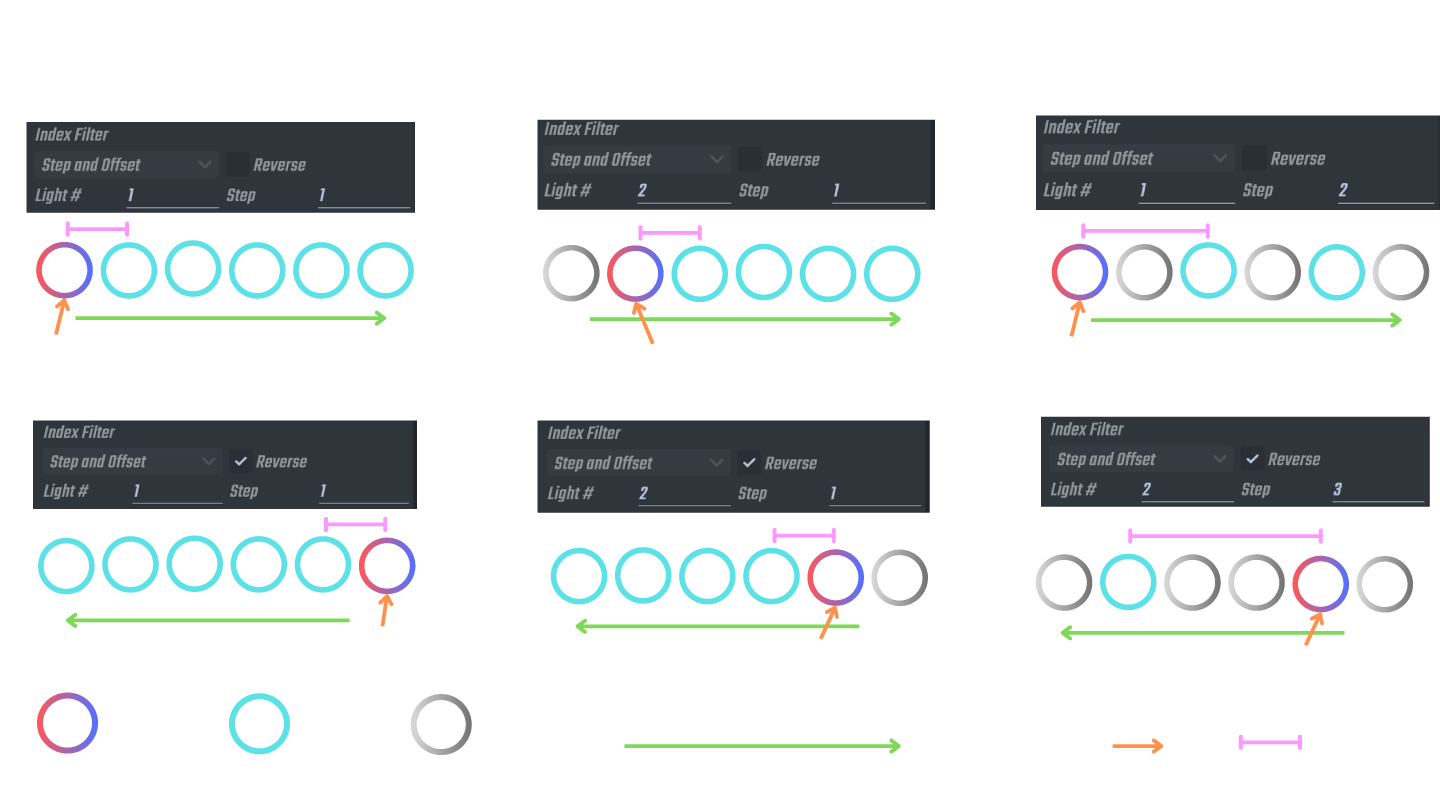
Index filters allows us to divide the lights in the group up in different ways, we can either divide them into sections or even choose a specific light in the group and even skip/omit others! We can also reverse the order of the lights which the effect occurs across.
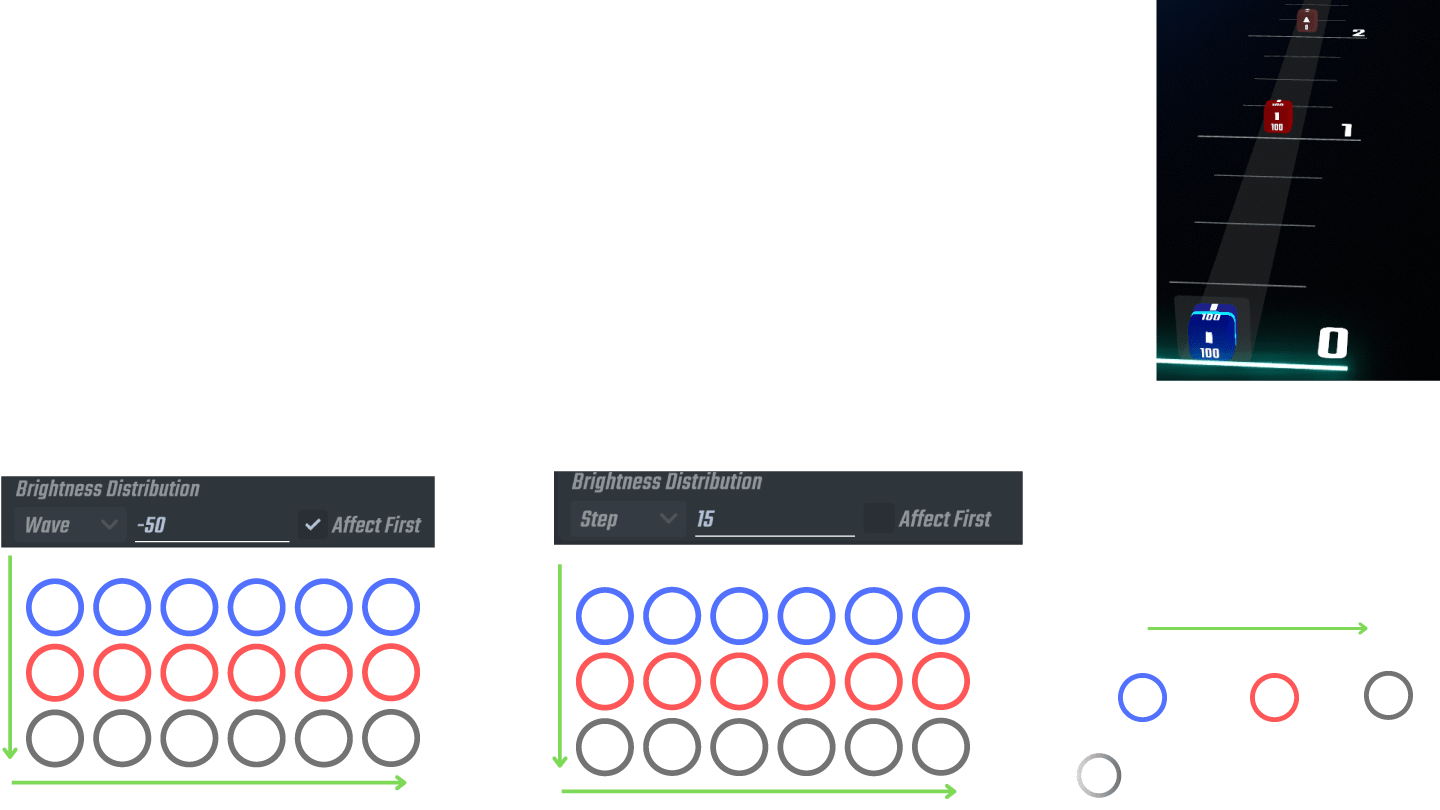
Brightness distribution allows us to alter brightness between different lights in the group so we can have some brightness gradients across the group really easily.
Below are several, very in-depth graphics and explanations for how each of these 3 sections act when changed within a colour group. It's very important to understand each and every graphic and what all the terminology means if you are wanting to master the Group Lighting system. I have provided several examples for each setting to really drive what each of them do.
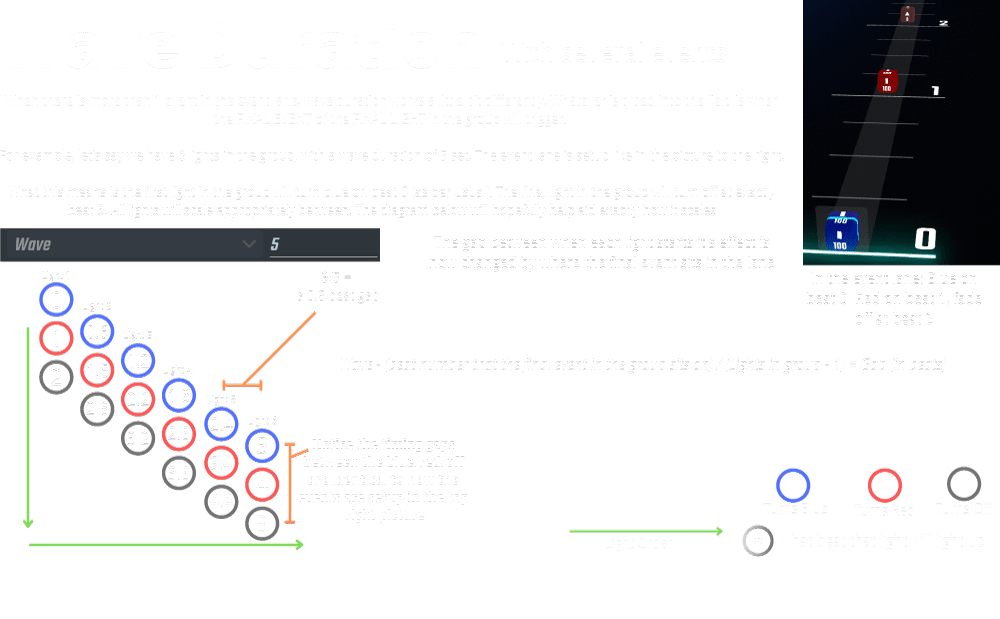
Wave Duration, Step Duration

Index Filters (Sections, Step and Offset)
Brightness Distribution
Rotation Group events
Rotation Lanes only exist for groups that have rotational control (self explanatory I know). They are depicted in the top view usually with the term 'Rotation' in their lane description. In the image below they are the ones with the Green circle.
Rotation lanes most commonly pair with colour lanes. In the same image below you will notice for every colour lane, there is a rotation lane right next to it.
When placing a rotation event, the group event (and events inside it) look very different from the colour events we have used throughout both V2 and V3 lighting systems as far.
They appear as a grey box, with details on it's front and top face depicting 4 pieces of information.
Rotation Angle
Loop Count
Direction
Easing
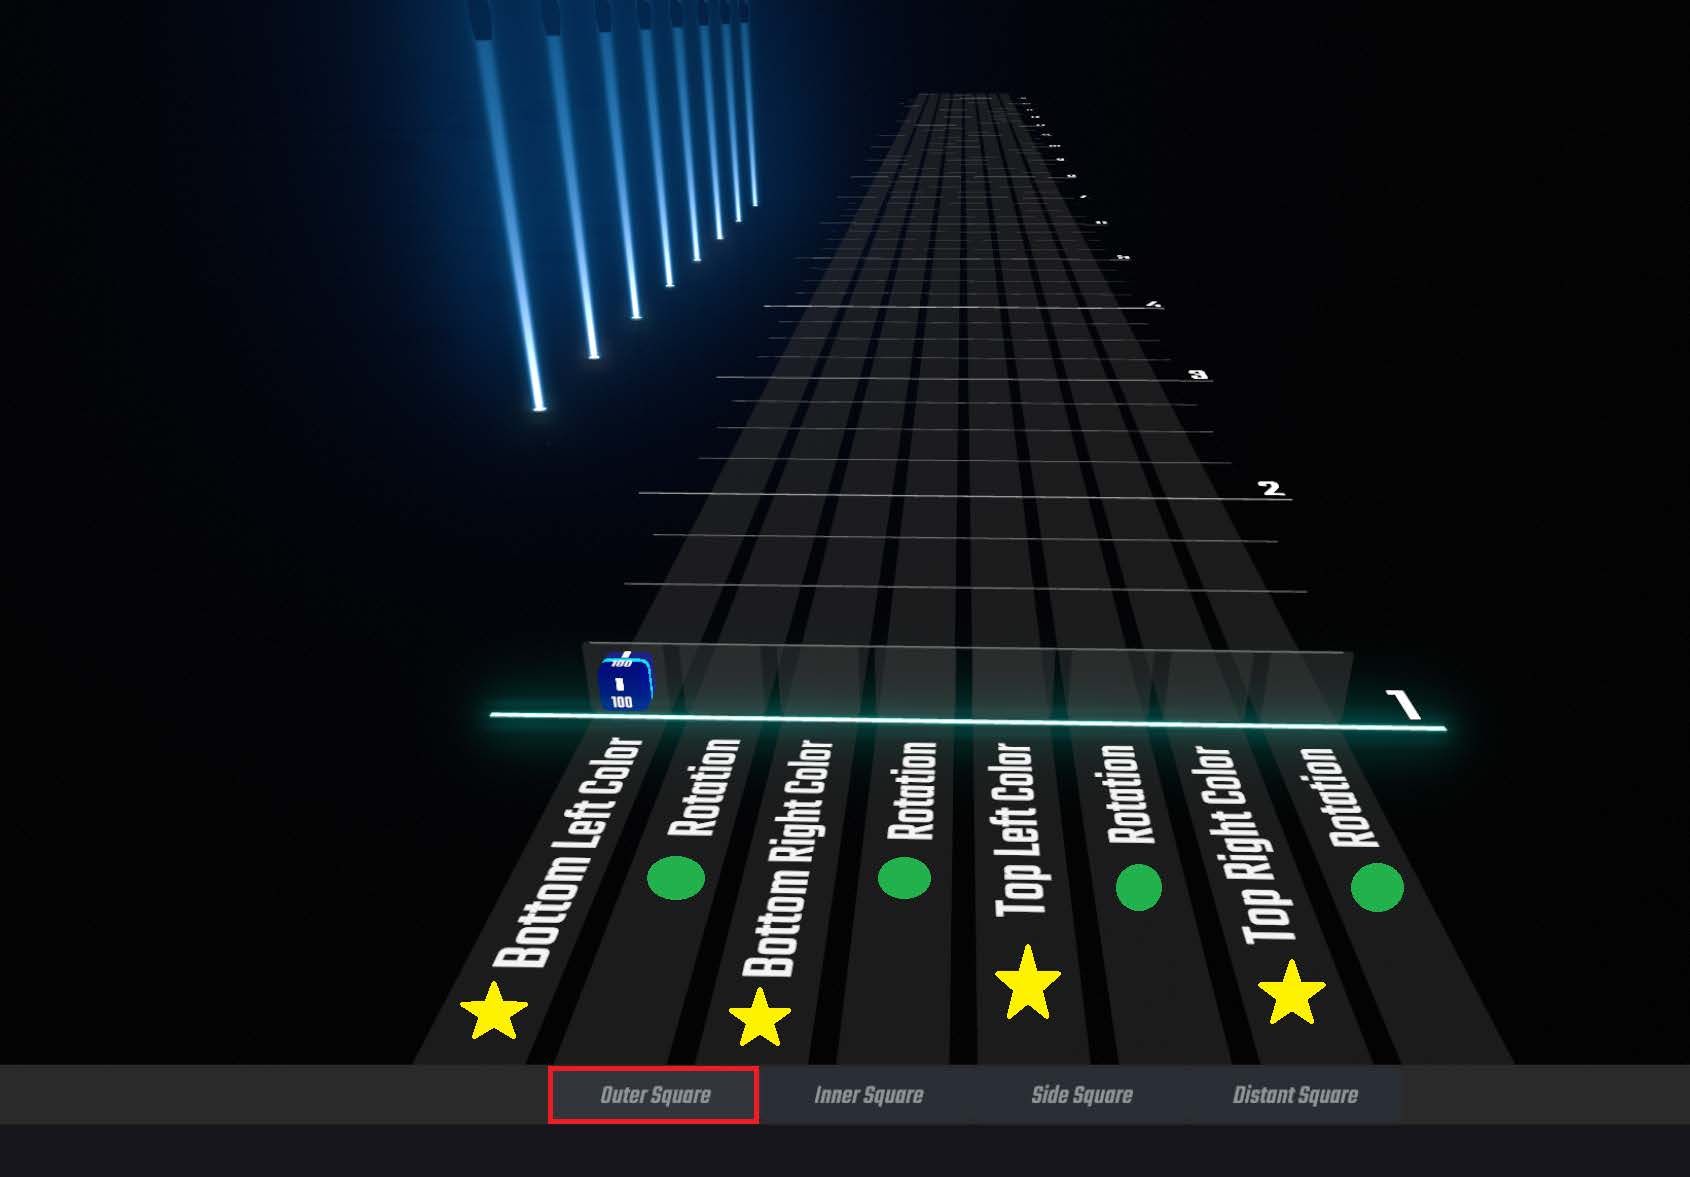
The 'Top view' of the Group Lighting System. The Stars indicate the colour lanes and the circles indicate the rotation lanes. A single Group Event has been placed into a lane, which is why the group of lights in the preview in the background are lit up. The Red square is indicating what page of lanes you have currently selected.
Rotation Angle
Each event placed within a rotational group lane must have an angle applied to it. This angle can exist anywhere between 0-355 degrees, with a granularity of 5. (Meaning you can place 5/10/15/20, etc).
This angle determines the angle that the lights will face in when the playhead reaches that event.
If we imagine 0 degrees is facing upwards, and we want to instead shine that light to the right, we would change the angle to 90 degrees. Downwards is 180 and Left is 270.
Rotation angle does have some initial hotkeys to easily place certain angles down quickly. When placing your rotation event, use the Keys…
Q E R
A D
Z X C
As the different 45 degree rotations. For example E is 0, D is 90, X is 180 and A is 270. Feel free to check the control scheme image below to visualise the angles a bit better.
Once you have placed a rotation event group box down, and say you want to alter that rotation to a finer granularity, simply open the group box (like what we did in the colour event groups, by left clicking on the event, which will 'open up' that event). Once inside, hover your mouse cursor over the rotation event you placed down and you can either hit alt + any of the hotkeys listed above to quickly snap to those different angles, or instead you can use alt + the scroll wheel to change the degree by the +/- 5.

UI for a Rotation Group Event. Notice how similar it is to the Colour group Event.
Loop Count
Loop count is an easy way to add an additional 360 degrees to any rotation angle. For example, if rotation is set to 0 degrees and I add 1 loop, it will spin 360 degrees back to the 0 degree rotation. If i add 3 loops, it will rotate 980 degrees, back to the original 0 degree rotation.
If you want a light to go from the 0 degree angle to the 450 degree angle, there's no way to set rotation directly to 450. Instead it would be setting it to 90 degrees, and 1 loop. (90 + 360 = 450).
There is no limit to loop count. To change loop count, simply make sure you are firstly inside the group event, hover your mouse cursor over the rotation event and hit alt + T to increase the loop count by 1. You can continue to click this and the loop count will keep rising. If you'd like to remove loop count, hit alt + R.
Direction
Rotation events for the most part, work like fade events. The lights will change angle when the playhead moves from one rotation event to the next one. So if there is a 0 degree event on beat 1, and a 90 degree event on beat 2. When clicking play, the lights will rotate from angle 0, to angle 90.
The thing is though, rotations can happen in 2 ways. Going from 0 to 90 could go in a positive manner (0 90), or it could go backwards (90 0). Clockwise and Counter Clockwise.
These 2 directions can be changed by hovering your cursor on the rotation event within the group event, holding alt and clicking either 1 or 3. We have an additional rotation setting (Alt + 2) which we call automatic direction. When set to this, the lights will automatically take the path of least resistance between the two angles (so the smaller angle). For example, if the first event in the lane is 0 degrees, and the second one is set to 179 degrees, the lights will rotate clockwise. If the second event is instead set to 181 degrees, the lights will rotate counter clockwise to reach this angle.
For more detailed information on these control schemes, see Editor Control Scheme
Easings
Easings gives us control over exactly how fast a rotation from one angle to the next takes. We have 5 easing options available to us.
InOutQuad
InQuad
OutQuad
Linear
None
Let's first start with None. When a rotation event is set to a None easing, it essentially means that there is no rotation that will happen over time between the event before it and itself. Using the example of the first event is at 0 degrees and the next one is at 90 degrees, what a None easing on the 90 degree event would do is when you hit play, the rotation will remain at the 0 degree angle, and when the playhead reaches the 90 degree event, the lights will instantly snap to the 90 degree orientation. There will be no movement between it at all. This is exactly what the 'static' event type we use in colour lanes and in the V2 system is, it's an instantaneous change to the settings of that event.
In the video below, the Blue light is showing the 'none' easing.
Blue light is NONE easing. Red light is LINEAR easing.
The remaining 4 easings all work like fade events.
Next we have Linear.
When the 90 degree block in our example is set to linear, it essentially means that the rotation of the lights from 0 to 90 degrees will occur at an identical speed for the entire duration between. There's no acceleration/slow down or anything. The video below displays the linear easing with the red light.
Our final 3 easings are similar to each other and actually have acceleration/slowdown as part of their movement.
InOutQuad when used, means the light will take a little while to get moving (the first 1/4 of it's length is spent speeding up), then for the next 2/4 of it's length it will be moving at it's max speed. The final 1/4 of it's length it will spend slowing down.
In the video below, the InOutQuad is shown as the white light.
White light is InOutQuad easing. The front purple is OutQuad. The rear purple is InQuad
InQuad and OutQuad work very similarly to InOutQuad. OutQuad will immediately start at it's full speed and stay there for 3/4 of it's time, and in the final 1/4 it will then perform the slowdown.
InQuad will spend it's first 1/4 of time speeding up, and then for the remaining 3/4 of it's time, will stay at it's max speed until it reaches the rotation.
OutQuad is shown as the Purple light that's closest to us, InQuad is shown as the purple light that's in the distance.
Durations, Index Filters and Distribution for Rotation Events
Fortunately Wave Duration, Step Duration, rotational distribution and the 2 Index filters work identically for rotation group events as they do for the colour group events, but instead of brightness, it is simply angle. The main new thing to learn about is the X and Y Axis.
The X and Y Axis and Flip Rotation
In the Rotation group event UI, you will have a drop down menu to select which axis your rotation is currently effecting, between the X and Y axis.
Every light that has rotational ability works differently from each other. For example, the bottom left group in the weave environment has it's 0 degree for the X axis pointing up, and when moving the rotation in a positive direction, it will rotate to the right (from the default camera position), Whereas the bottom right group, when using the exact rotation, will instead rotate to the left (from the default camera position).
These nuances are purposeful and will be explained later in the duplication section of the guide. But for now, the purpose of mentioning this is that to familiarise yourself with what the X axis and the Y axis controls, it's best to simply try it out. Set up 2 events in a rotation lane, with the first set to 0 and the second set to 90, click play and see what it does, then change the axis from X to Y and see how it is then impacted.
Another way to easily see what's happening is to place a rotation event down, and when modifying it's rotation with alt + scroll wheel, you will actually see that light in the background in real time change it's rotation (as long as the light is turned on in the colour lane so you can see).
Sometimes you may find when changing the rotation angle, that nothing is happening at all! This is highly likely due to the fact that the angle on one of your axis' is set to be completely parallel to the rotational axis of the other axis. This may sound confusing, but here's a way to check it and understand.
In the video below, I am first moving around the rotation when on the x axis, notice that it moves just fine. I am then switching it over the Y axis, but now that i'm changing the angle, nothing is happening? In the video notice how i zoom up all the way so that the base of the light is visible, and now when i try and change the rotation angle for the Y axis, you can see that it is in fact altering the light (The little light itself is spinning), but because of where i left my X axis rotation, the Y gives the impression that it's not actually changing angle at all.
Showcases how the Y axis IS impacting the rotation, but the X axis being parallel to the Y axis itself gives the illusion that the Y axis is doing nothing.
What we can do is change the group back to the X axis, and set the X axis to a different degree, in the video i change it to 45 degrees.
Once changed, i now am leaving the group event, adding a new group event in the lane and setting it to the Y axis.
Now when i am altering the angle of this Y axis group, you can see that there's actual movement of the angle!
Yes, that is correct - X and Y axis can be controlled independently. They do not override each other or 'replace' each other.
To give an example, let's say i put an X axis rotation of 0 degrees on Beat 1, and a X axis rotation of 90 degrees on Beat 10.
If i click play, the rotation will occur as expected.
But now I am going to place a new rotation group event on Beat 5, but set it to the Y axis at rotation 0. And another at beat 15, Y axis, rotation 90.
n the colour lane events we are used to the fact that things happen in order, and so you may expect that what will happen is that what will happen at the start is that between beat 0-5, nothing happens at all, then between beat 5-10, the x axis would move from 0 to 90, then from beat 10-15 the Y axis will move from 0 to 90. But this is not how axis' work. They work independently, meaning the X axis rotation will fully occur between Beat 1-10, and then Y axis rotation will occur from Beat 5-15. The video below shows this occurring.
In the Group event UI, there is a tickbox for 'flip rotation'. This simply changes the direction (clockwise/anti clcockwise) for the rotation of the angle. I previously mentioned how the bottom left and bottom right groups in the weave environment by default bend towards the centre of the screen when using a positive rotation value. If for example you instead wanted them to go outwards, rather than having to manually change your rotations (for example from 90 to -90 (270)), you can instead just tick this box.
Showcases how X and Y axis are completely independent from each other, even within the same rotation lane.
Rotation Distribution
Rotation Distribution works identically to how brightness distribution works in the colour lanes, but to clarify some things here's a bit of a more thorough explanation.
When using rotation distribution, the value you type in here can be any value, even to single digit degrees. When it's set to wave duration, like all other forms of using wave, you are typing in the angle of the FINAL light in the group. So if the block is a 0 degree block, and it has 10 lights in it. In rotation distribution you have it set to wave and you type in -90. The first light will be at 0 degrees, the final one at 270 (remember, 0 and 360 are same thing). The remaining lights will now be equally spread between them. You can see this in the example in the image below.
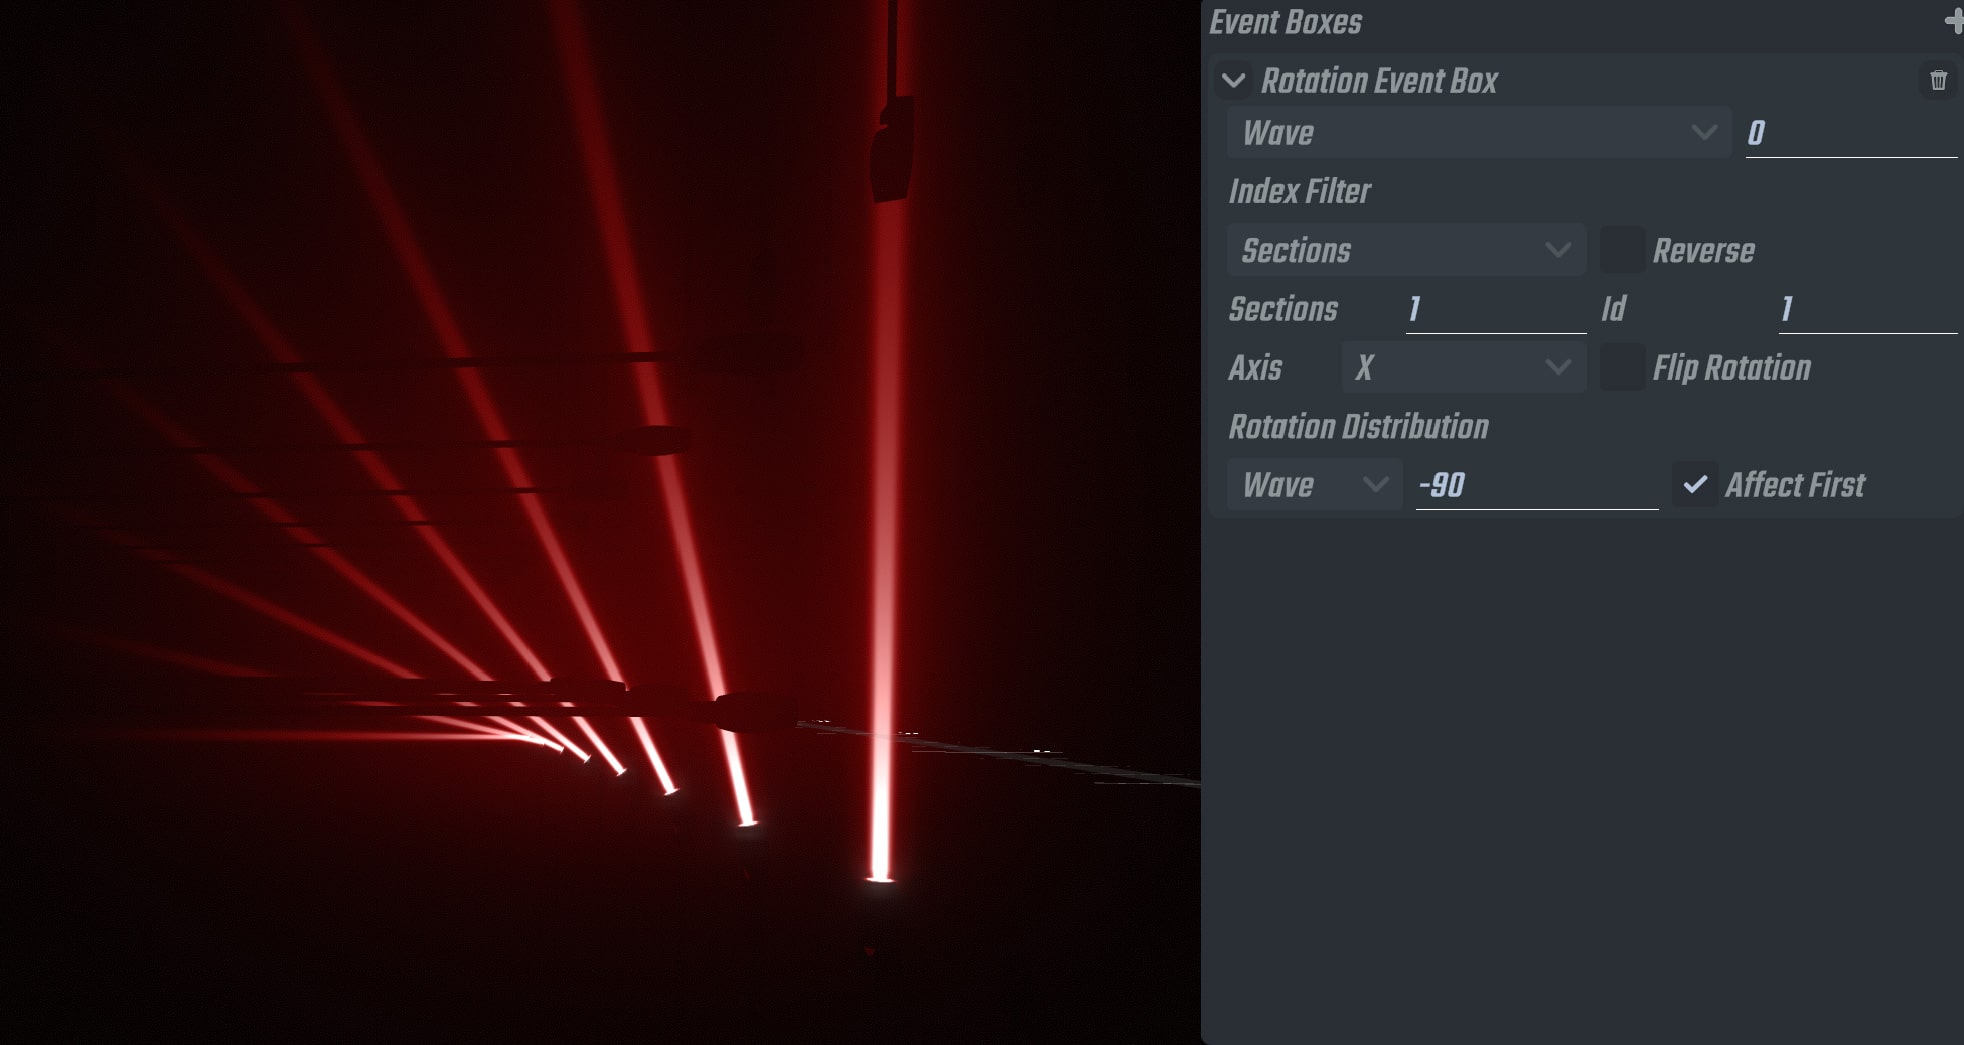
Rotation distribution set to -90.
The tick box for 'Affect First' also works the same as brightness distribution. In that if enabled, the very first event in the lane will also have the distribution effect applied. It's more apparent why this setting exists in the rotation group blocks whereas it may have been confusing why it exists in the colour group block. The use case here for example, is lets say within a single rotation group block/event, that i have 2 events. a 0 degree on beat 0, and a 90 degree on beat 5.
If i click play, they will all rotate. If i now apply a rotation distribution to the UI, and tick the box, what will happen is the lights will be in this 'fan' orientation throughout the entire effect. But lets say i want the effect to go from a closed state to this open state. If i instead have 'Affect First' un-ticked, then the rotation distribution won't be applied to the 0 degree event, and so the lasers will remain parallel with each other. But when they rotate to the 90 degree angle, they will then 'fan out', giving me the effect i was trying to go for.
Extension Blocks
Extension Blocks can be used in both colour and rotation lanes, It is a special Block type that will 'hold' onto the values of a prior group up to where it's placed. For example if a red 100 brightness group event was placed on beat 1, and a red 0 brightness fade event was placed on beat 10. When playing, the light will fade from 100 to 0 from beat 1 to 10 as expected. If I placed an extension event on block 5, what would happen instead is the light would turn to 100 brightness at beat 1, it would remain at 100 brightness until beat 5, in which it would then only start to fade down to the 0 brightness at beat 10.
To place an extension block, simply hit the number 4 on your keyboard and left click to place one down. They will look like a solid, grey block.
Extension blocks are incredibly useful, especially in the rotation group lanes. This is because the majority of rotation events you place will have easings on them. Let's say you've finished making lights for the chorus in a song and you're now working on the verse after it. After finishing it, you go back to your chorus and now when hitting play, your lights are all messed up! All the rotations have gone crazy and aren't acting like they use too, what happened!!?
Well, remember how we learned that the X and Y axis work independantly? An example of what could have caused what happened above to happen, is let's say perhaps in the chorus, you had the Y axis at the start of the chorus set to 0 degrees, and then for the whole chorus light show you never touched the Y axis again, just the X axis. So when you were making it, that Y axis was always at 0 and so the show is as you wanted it.
Then when you started to make the verse, you changed the Y axis to a 90 degree angle, and you left the easing on Linear, you've then made the entire verse with the Y axis set to 90 as you intended.
Now when you've gone back to the chorus and hit play, what's happening is although all the X axis rotations are perfect, you've accidentally without being aware, had the Y axis for your groups slowly move from 0 degrees to 90 degrees throughout the entire chorus.
This can be resolved by making sure to use 'None' easings a lot in rotations, but ultimately, none easings (instant snaps) can a lot of the time not look very good, they are quite unrealistic in the grand scheme. Instead, what we can do is to use an extension block, that we could place between the end of the chorus and start of the verse.
This way, the Y axis will remain at the 0 degree during the chorus like you had originally designed, all the way up until that extension block, and THEN it will transition to the 90 degree angle that you've placed at the start of the verse.
Extension blocks can save a lot of frustration when it comes to rotations. There are lots of numbers and information all over the place, blocks within blocks and sometimes you cannot figure out how to get something to work as expected.
It's good practice to end a section of a song with some extension blocks in each of the lanes you were using, and to even 'reset' the lanes to default rotations. We can do this by placing a group event down for the X axis and the Y axis and setting them to 0 degrees, right after the extension blocks. This pretty much means we've 'reset' the rotations in the environment to a clean slate so that we can now start making some awesome lights for the next section!
Multiple event boxes within a single group [Advanced]
Now we get to the real power of the group lighting system. This section is certainly the most advanced area of the system and I highly recommend to familiarise yourself with all other areas of lighting before getting into this.
When you open a group event in either the colour or rotation lanes, the UI that pops up has a small plus symbol in it's upper right (see image below).
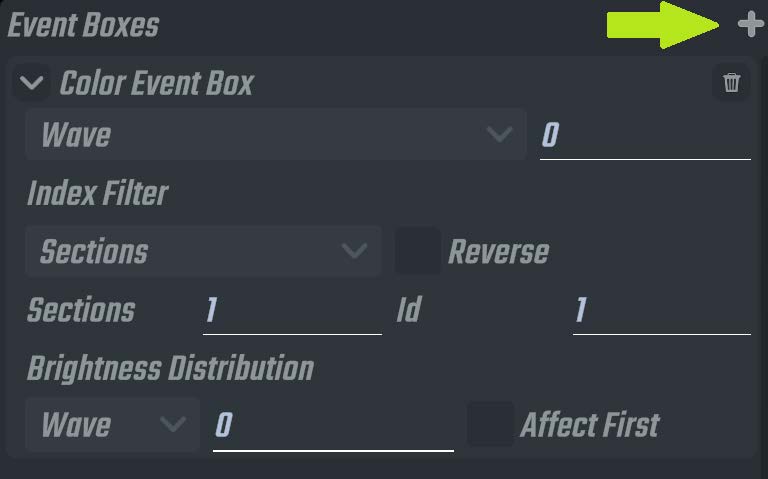
The Plus button which adds an additional event box within the group event you are in.
Go ahead and click it.
What's that? A second lane has appeared!? And a second UI in the Event Boxes list also has!
That's right. Multiple lanes can be created within a single group box that exists in a single lane in the top view.
How many lanes can you add here? As many as you can try to fit. In some official songs i've personally had as many as 30 of these individual lanes within a single group box, with as much as 1000 event lights throughout those lanes.
The true power!
Anyway, there's ultimately only a few things to know about event boxes and that's primarily to do with their order.
When clicking the plus button, not only does the lane appear, but more dropdown UI boxes on the right will appear (see image below).
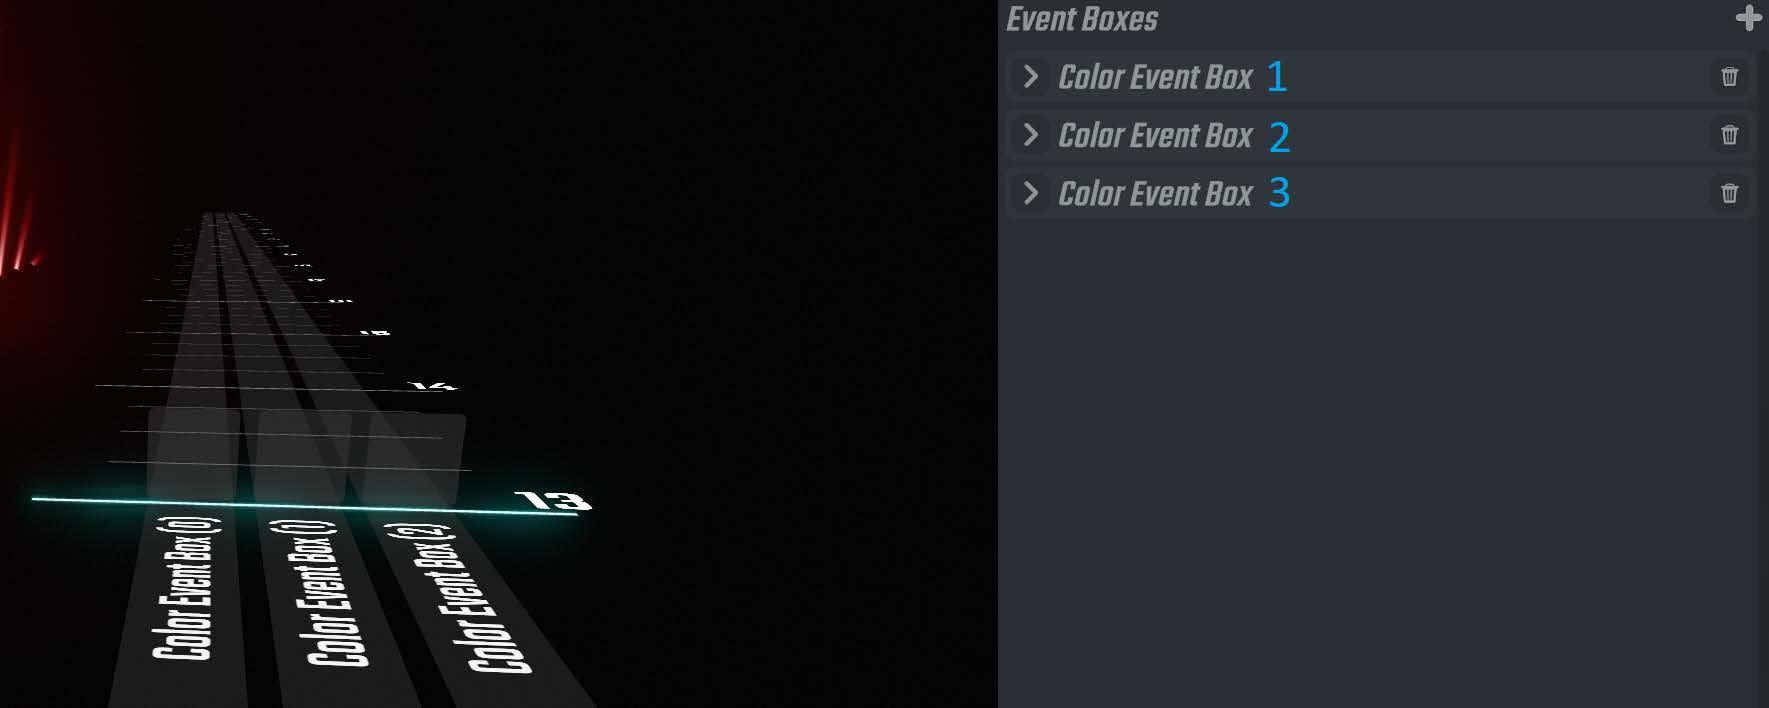
Showcasing 3 event boxes within a single group (also shows the 3 lanes)
Event boxes do override eachother, in order from top to bottom. So whatever is set in Box 1, will overwrite and events that exist in Box 2/3.
This is where your index filter skills will come into play a lot.
Let's give some examples of what having multiple event boxes can do.
First simple thing is we create 2 boxes, in the first one i will divide the group of lights into 2 sections and want to control the first section (ID #1). The second box i will also divide into 2 sections, but i will control the second section (ID #2). In the 2 lanes that are now in front of me, i have a blue event in lane 1, and a red event in lane 2. I now have the first half of the group as red, and the second as blue.
Because event boxes higher up (the most left lanes) overwrite other lanes, instead we could actually change the second box instead of being split into 2 sections of 2, we can leave it on '1 section'. Which is pretty much the same way of saying 'the rest of the lights'.
So what's happening is event 2 (the blue lane) is actually turning all 8 lights to blue. But because event box 1 (red) overwrites event box 2 (blue), the first 4 lights will actually turn red. The 'overwriting' i speak of is ONLY for individual lights that are shared between several event boxes, it doesn't completely negate everything the 2nd event box does.
The short of it is, the 2nd event is making all 8 lights blue, B B B B B B B B
The 1st event box is only touching the first half (2 sections, Id 1), and so changes the first 4 to Red, R R R R B B B B
Getting your head around overwriting can take a bit of time, especially because such things don't just exclusively happen within a group box, but also in subsequent groups.
Example pattern made possible with multiple event box system.
Anyhow, let's look at another example of what using multiple event boxes can do.
In this next example, i have 4 event boxes.
In event box 1, i am using step 0 with offset 1, colour white, which means i have just the very first light in the group selected (Light 1)
In event box 2, i am using the same setup as event box 1, but I am using 'reverse', which means instead i'm selecting the last light in the group. ( Light 8 )
In event box 3 i am using step 2 with offset 1, colour red. Which means i'm selecting every odd light (1/3/5/7)
In event box 4 i am using step 2 with offset 2, colour blue. Which means i'm selecting every even light (2/4/6/8)
Now, let's think about this in order going from bottom, up.
At first i am turning Light 2, 4, 6, 8 to Blue
In Event box 3, i am then turning light 1, 3, 5, 7 to red. No overwriting occuring yet.
In event box 2, i am then turning light 8 to white, so i'm overriding the blue 8 that event box 4 would have done.
In event box 1, i am then turning light 1 to white, so i'm overriding the red 1 that event box 3 would have done.
All this happens instantaneously, and you can see the result in the image below.

Example pattern made possible with multiple event box system.
Having multiple event boxes in a single group is also possible for rotation lanes. In some earlier examples when learning about X and Y axis, even in the videos i showed myself backing out and creating a brand new group so i could then adjust the Y axis.
But this is not necessary, because with the multiple event box system you can instead control both X and Y axis at the same time within the same group. Simply create a group event, go inside, click the plus button to create an additional event box within that group, and then set that second group to the Y axis, bam! You now have instant full control over both axis in the 2 lanes in front of you.
You may have noticed earlier on when learning about extension blocks, that extension blocks themselves are also groups. When placing them in the top view, you can click on them to go inside them. You can actually see that by default they generate 2 lanes automatically, one for X and one for Y axis. This is why they extend the X and Y axis without having to change any settings.
Strobe system
One quality of life system that was implemented as part of the group lighting system (and therefore does not exist in the V2/F3 mode lights), is a strobe system.
In the UI to the left you can see a strobe section with different settings, these fractions simply show the frequency at which the strobe will flicker. For example, the strobe effect /2 means that the strobe will turn on and off at every half beat (beat divided by 2). This is quite a slow strobe, but you can go up to very fast rates including 1/32.
When a strobe effect is applied to an event, the front of the event itself will show this additional information. In the example on the right you can see the first event has a strobe frequency of 16 and the second one a frequency of 4. The final event does not have the visual on it at all, which is the same as saying it has 0 strobe. Technically every single event that you ever place has a strobe effect applied, it's just that when it's set to 0 it doesn't appear, but it's mindful to think that it's still a /0 strobe. The reason to think like this is because strobes also interact with the static and fade systems.
In the example below, what is actually occuring is at beat 0, the lights in the group will start flashing/strobing at a frequency of 1/16th of a beat. If no other events were after this, it would continue to flash until the end of the song.

A /16 static strobe, A /4 static strobe and a /0 fade strobe.
Anyhow, at beat 0.5 we instead of a 1/4th beat strobe. When the playhead reaches this, the strobe will decrease in frequency to this 1/4 speed.
Now remember how i said that each event technically has a strobe rate applied to it? Well let's try and imagine that that final event at beat 1, is a 0 strobe event.
The event itself is also a fade (depicted by the triangle). What this means is the second the playhead hits beat 0.5, not only does it reduce to that 1/4 strobing rate, but it will actually completely slow down over that next 0.5 beats until at beat 1, the strobing effect will stop and the light will just simply stay on.
Fading strobes is quite powerful, you just need to make sure to remember they are influenced by the static and fade settings of an event itself.
Duplication system
In the top view, we have an additional unique hotkey for selected group events, and that's duplicate (Ctrl + D), When doing this, the event itself will duplicate into other lanes on the same page you are on. These pages are specially setup so that they will onto duplicate into other lanes on the page for groups that feel appropriate for them to duplicate into.
For example, in the video below which is exampling the EDM Environment, Notice how the blue event i'm duplicating only gets duplicated into 3 lanes, not all 5. This is because these 4 lanes in general are very similar to eachother and are set up with mirroring at the environment-creation level so that they will very quickly, symmetrically match.
Duplication system in action, showcasing rotation and colour lane simultaneous duplication and how duplication overwrites prior placed events.
Duplication also works for rotation lanes, and you can even select both the colour and rotation lane of the same group and the duplication will occur as intended. (see video above of this in action).
Duplications also overwrite other events in the remaining lanes. So if you change the colour of an event for example, but want to update it in all the lanes that feel appropriate, using ctrl + D after selecting the note will do just that, this is also shown in the video above.
Quickly Change colours
A hotkey that allows you to instantly toggles a lights' colour from Red > Blue > White > back to Red, is to hover your mouse cursor over the event and hit the middle mouse button.
You can also do this to group events themselves in the top view, and it will toggle ALL events within it to the next colour in the toggle.
For example if i place a red group event down, go inside it, and a few beats ahead place a blue event, i've now got the red and blue event inside this group. If i tap ESC to come back to the top view, hover my cursor over the red group event and hit the middle mouse button, i will see the red has changed to a blue, but if i go inside that group, you can also see that the blue that was in there has now become a white.
Shows the quick switcher between group events that exist at the same time on the same page.
Additional Tips and tricks.
When you are INSIDE a group event, you may notice that at the bottom of the UI where the pages are usually listed, these have been replaced by tabs of the names of all the lanes that existed on that page. If there is an event that exists in another lane at the identical timing as the one that you are in, you can quickly switch over to that event without having to back out to the top view and entering the other one. You can see this happening in the video below.
The selection system, including copy, paste, cut and such works in the top view of the group system. Including the selection marquee (Shift + drag).
Currently this functionality is not possible within a group itself, but it is in the backlog to have done.
If you are quite confused about the group system in it's entirety and would rather light the lights in a classic fashion to how V1/V2 lights work, it's theoretically possible. For example let's take a single group of 8 lights, and create a group event in the lane. If I enter that group and make a new event box for every single light in that group (so 8 lights), by setting the step and offset index filter for each light, and leave all other settings alone, i have now essentially created a traditional lighting setup that is identical to the V2 lighting system (see the video below). Note: A 'super add' button is planned to be implemented which will automatically generate the event boxes with the correct filter settings for all lights in the group to re-enact this exact scenario.
Shows how it’s possible to setup a group event block to allow you to light in a traditional manner (1 light per lane). Useful if you cannot work out the correct settings to automate certain effects, or are struggling to understand the group system in the first place.