Preparing the Grid alignment using the BPM tool
Aligning the start of a song
One of, if not the most important part of preparing a song file for mapping is to make sure that the grid within the editor will align with the beats of the song. Sometimes you will have a song that will immediately work without having to modify anything but more often than not the song will not be aligned with the grid. For most songs we simply need to just inform the editor where we want the grid to start from, but there are some songs that may have something we call Variable BPM which may involve a lot of work within this tool. If this is your first time mapping, it's highly recommended to be choosing a song that has a static (non changing) BPM. Most modern dance music is a safe choice.
The first thing you want to do in this screen is to simply hit the spacebar to play the song. You will hear a metronome ticking sound playing over the song. The sliders in the lower right of the screen will allow you to adjust the volume of the music and the metronome so that both are comfortably audible. Start tapping your foot to the beat of the song and see if the metronome tick sound and your foot are matching the same timing. Scroll ahead to a later part of the song to also check it's still in time. If it is matching, we then want to look at the main timeline in the center of the screen. Some songs that are very clear in sound should be easy enough to actually see the beat in the visual waveform. Anytime the cyan waveform has some distinct lines that are equally distanced apart is usually a good sign of where the beat is.
If your foot tapping and metronome were matching with the music, and the grey markers are also visually lined up with the cyan spikes of the waveform, then your song is already aligned and you can immediately back out to the song info screen using the back arrow in the top left of the screen.
Chances are though it's not aligned. What we need to do is first align the very beginning of the song.
The way to initially visualise the issue we have as a concept is that we have specific point in time, at the very start of the song. Before this point there is a random amount of time that is not in time with the beat, and then after this exact point in time, everything is in time.

For example, lets say our song is 60 beats per minute. Which is the same as 1 note per second.
Let say the first beat though starts at 2.16 seconds into the audio file. That means that at exactly 2.16 seconds is this point of time i am referencing. The first 2.16 seconds is a random amount of time that has nothing to do with the bpm, but then the bpm does start, with a beat at 2.16 seconds, 3.16 seconds, 4.16 seconds, etc.
Those areas before and after this point in time we will call regions.
What we want to do is to tell the song when our first beat actually starts.
In the timeline view there is a large series of grey vertical lines, these are called markers and actually 1:1 visualising our grid that we will later use in the editor view.
1st step is for us to make our 2 regions. Select the 'split' button in the left UI, as well as the 'round' button.
In the timeline view, all the markers have numbers at the top of them. We need to make a split at the 1.0 marker. The round button we clicked means we will split our region into 2 regions at the marker closest to our cursor when we left click. Meaning we should left click right next to the beat 1.0 marker.
If done right, the grey 1.0 marker should turn into a blue marker. If a different marker changed or the blue line didn't appear where intended, use ctrl + z to undo and try again.
Once our 1.0 grey marker has turned blue, we are good to head into the next step.
On the left UI, we now want to choose the 'select' tool and also to tick the box that says 'Stretch'.
The select tool allows us to move around the the markers so that things line up. The stretch tickbox allows the grid to properly adjust to our changes.
The new blue marker that has appeared, has the central box on it that we can click and drag to the left and right whilst the select tool is enabled.
We want to move this blue marker to align with the first beat. In our example this would be the beat we see at 2.16 seconds.
Once we have moved the blue 1.0 marker to this point, we then want to align the grey marker to it's right (2.0) with the second beat. Simply grab the marker's handle and line it up to the second beat. Notice that the 1.0 blue marker does not move anymore, but all other grey markers to the right of 2.0 are scaling whilst you are moving around the 2.0 marker.
Once the 1.0 and 2.0 markers are lined up, click play with spacebar and now test again to see if things are lined up.
Chances are they will be, amazing! But, if you listen long enough, the timing may start to not be aligned again.
This is because our hearing and even with visual aids can only be so precise.
For example, i mentioned the first beat of the song is at 2.16 seconds and the second beat is at 3.16 seconds, 4th is 4.16, etc.
When you were aligning the markers, perhaps the blue one was put on 2.15 and the grey one was on 3.17. Visually, and audibly they will sound correct, but the gap that we have made which is 1.02 seconds, is the same gap that will occur between every marker going further into the song. Meaning Marker 3 will actually be on 4.19, whereas the song's real beat is 4.16. This gap will get worse and worse over time.
To resolve this, it's fairly simple. Hit spacebar and keep playing, when you are really starting to see the beats and markers not align anymore, you can still grab a marker and adjust it, even if for example we are now at marker 38, you can adjust marker 38 and all markers in this current region will realign. so marker 2.0, and even the final marker in the song will adjust when dragging this around. Let's say this time we got our marker exactly on 38.16, which is perfect. Things should now be lined up, right?
Well not so fast. In my example above, the 1.0 marker was on 2.15, which is still 0.01ms off what it should be. Because of this, there will still be super minor variations between markers.
This is something that is naturally going to happen, but we do have means to resolve this too.
Instead of trying to worry about exactly where the 1.0, 2.0 and 38.0 markers should be, we can instead just make sure that each region is as best as we can make it.
So for example, let's put the blue marker back on 2.15 and the 2.0 marker on 3.17, so we have this non-perfect beat timing of 1.02ms. Audibly and visually, things feel and sound perfectly aligned up until (for example) beat 20.
What we can do, is change back to the split tool, and make a new region split at beat 20. The beat 20 marker will turn blue. This means that now if we make any adjustments to markers beyond beat 20, none of the markers in the first region (1-19) will be touched. We are happy enough with the alignment and timing of those first 19 markers.
Now that we've made a new region split at 20.0, we can switch back to the select tool and now repeat the process, so move the 21.0 marker to your best guess at where the song's beat 21 actually is, click play and when things start to not align correctly, create a new region, etc.
The more and more you use the bpm editor tool, the better you will get with it where instead of several regions being made, you may only need the 1, with your alignment at the start and end of the song being perfect. Play around and try your best. The best part is if you make a mistake, even after you've started mapping the song, you can always re-visit the bpm tool and modify the regions and markers. Your notes and lighting back in the editor will re-align perfectly.
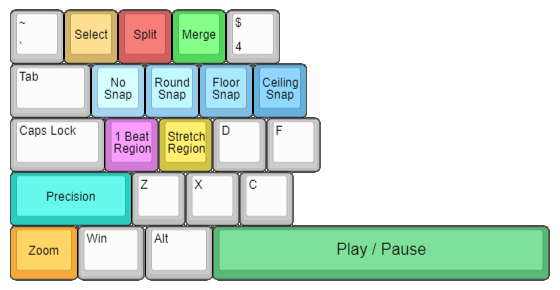
For more detailed information on this control scheme, see Editor Control Scheme
| Quit | Returns to the Song info Screen |
| Select | Changes the cursor to select mode, where you can drag around markers. |
| Split | Changes the cursor to split mode, where you can click to split regions. |
| Merge | Changes the cursor to Merge mode, where you can merge 2 regions back into 1. |
| Snap | When dragging in Select mode or splitting in Split mode, if Snap is enabled, it will impact the closest marker to the cursor's location. |
| No Snap | When dragging in Select mode or splitting in Split mode, if 'No snap' is enabled, it will split at the exact cursor location. |
| Round | When dragging in Select mode or splitting in Split mode, if Snap is enabled, it will impact the closest marker to the cursor's location. |
| Floor | When dragging in Select mode or splitting in Split mode, if Snap is enabled, it will impact the closest higher marker to the cursor's location. |
| Ceiling | When dragging in Select mode or splitting in Split mode, if Snap is enabled, it will impact the closest lower marker to the cursor's location. |
| 1 Beat | If enabled, when splitting a region, the new region will be 1 beat in length. |
| Stretch | If enabled, regions will stretch when dragging markers. |
| BPM | Shows the current BPM of the region the playhead is sitting in. Can be A |
| Beats | The amount of markers within the region that the playhead is sitting in. |
| Time | The current time of the playhead. |
| Playhead | The current sample that the playhead is sitting on. |
| Hover | The current sample that the cursor is sitting on. |
| Timeline | Time primary Timeline, where all the fun stuff happens! |
| Zoom Slider | Allows you to zoom in the waveform. Also possible with ctrl + scroll. |
| Speed Slider | Allows you to speed up/down the song. |
| Music Slider | Adjusts the Volume of the music. |
| Metronome Slider | Adjusts the Volume of the metronome. |
| Reset Buttons | Resets the respective sliders to their default position. |
Dealing with Variable BPM
Technically, You've already learned how to use the bpm tool for variable bpm! Just create a new region split at where the bpm changes, and align the markers after the split to the new bpm!
If you know the exact bpm values of the 2 regions, you can use the bpm field above to type in the exact bpm for that region (just make sure the playhead is within the region you are modifying).
Dealing with a BPM that changes gradually over a period of time?
Ah, the final difficulty of mastering BPM!
This functionality is also supported in this tool, but it is a bit more manual.
A gradual change in BPM is not always exactly linear, in fact, it would be impossible even with a list of every standardised easing there is to fit songs that have this quirk.
Instead, to deal with gradual bpm changes, we have to align each marker ourselves during the transition.
It's a bit easier than it sounds.
At the bottom left of the tool area is a tickbox that says '1 beat'. If we tick this, what it does is that when we split a new region, the region created will be exactly 1 beat long. no matter how far ahead from the previous region marker we have, it will still be a single beat long.
The work process to get this done is to use what you've already learned by creating a new region split and align it to the very start of where the gradual bpm is to start.
Once this split is aligned, tick the '1 beat' box, and make sure split is enabled. Make sure 'no snap' is also ticked, which means grey markers are going to be ignored entirely and instead we will be creating the new region markers at the exact point the cursor is placed. What you want to do is then click on the waveform where you believe the next beat is. Repeat this for every beat right up to when the song (may or may not) get back to a steady bpm. This may be dozens of markers in a row. Once they are all placed, untick the 1 beat box, go back to the select tool and now if you want to make adjustments to the 1 beat region markers, you can do so. Make sure the 'stretch' tickbox is always selected when doing this.
One final thing to repeat, is that don't worry if your alignment is not perfect. You can always revisit the bpm tool after you have started mapping. If you find your notes aren't in time in your variable bpm section later in the song, come back to bpm tool and change things. Your notes and lighting will update appropriately.
Good luck! If there's anything to learn to master in the early days of mapping it's the BPM tool. Understanding and being able to use the tool will allow you to use many different genres and types of music.