Placing Notes, Bombs, Walls, Arcs and Chains (F1 Mode)
The lanes, playhead, bridge and vertical gridWhen entering a beatmap from the song info screen, you will see In the center of the editor is the main window where all the magic happens. You should be seeing a grey 4 x 3 grid of squares sitting above 4 marked lanes beneath it. The point they meet is a bright blue horizontal line.
Navigating the bridge & beat subdivisions.So, our playhead is currently seated at Beat 0, or perhaps you clicked spacebar to play and pause during the example above. So we know how to navigate forward, but how do we navigate backwards?
|
 The 'vertical grid', sitting on top of the 'playhead'. The 'bridge' is the 4 lanes that extend into the distance behind the vertical grid. 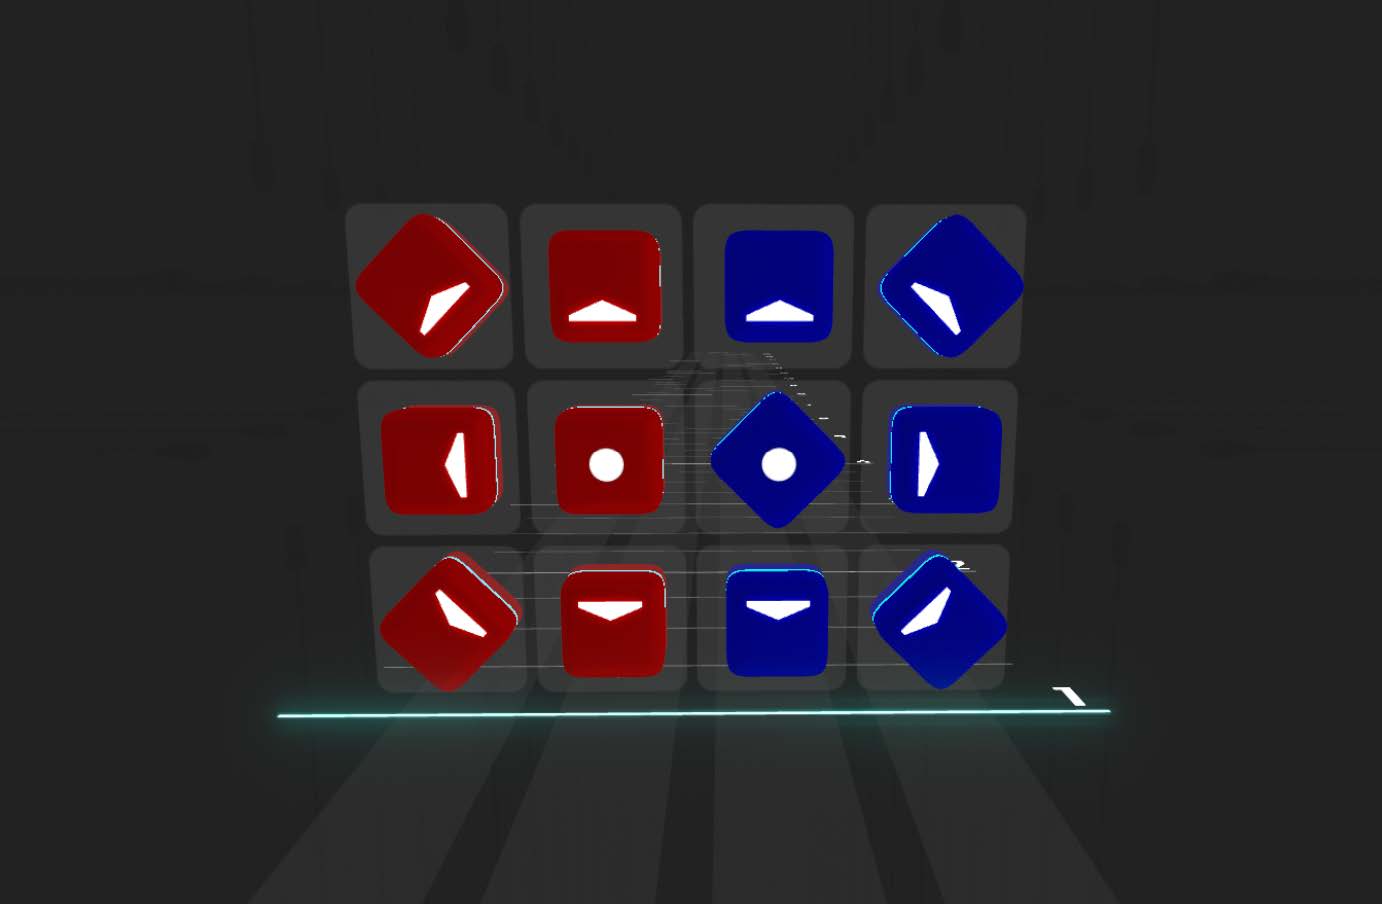 Different notes that can be placed on the 12 spaces  Some Walls and Bombs that have been placed  The 3 different Arc Rotational Directions. (Colour means nothing here). Note that the 'Straight' Example also shows the multiplication of it's curves set to 0.5, distinguished by the white text next to the blocks. 
For more detailed information on this control scheme, see Editor Control Scheme |
Deleting
Deleting any type of note, wall, etc within the level is easy. Simply click the number 5 to go into 'delete mode'. You know you will be here because the vertical grid itself will disappear. When in delete mode, simply left clicking any object will delete it.
Notes
Notes are fairly straightforward to use, they can be placed by either clicking on the UI on the left to select colour and direction, and then to click on one of the 12 spots on the vertical grid to place it.
The quicker method to learn is to use the keyboard hotkeys.
Notes are selected using the WASD layout, if you play video games on PC this will feel very natural.
Put your cursor onto one of the 12 grid spots, but don't click yet. When your mouse is here, let's first select a note colour. Click the number 1 on your keyboard for Red, or number 2 for blue. When you click this, you should now see at the end of your cursor on the grid, a faint looking red or blue block. We have not placed it down yet though! But before we do, let's select a direction.
Click W, A, S or D to select up, left, down or right respectively. You should notice the ghost note at the end of your cursor to be updating as you click the keys. If you would like to place a diagonal, simply click to keys together. Example: W and D selects an up right diagonal.
Once you're happy with your selection, simply left click onto the grid space you would like to place the note, done!
If you want to place an arrowless (dot) note, click the F key. You can click the F key again to toggle it to a 'diagonal dot' note if you wish.
Feel free to experiment by placing different notes into the grid, and scrolling the playhead ahead in time to place other notes. See if you can come up with a simple pattern to the song you've selected!
Modifying placed notes
Direction: If you have placed a note but instead wanted it say.. a different direction, it's quite easy. You could just delete it and place the correct one, but instead it's much easier to hover your cursor over the note you would like to change, then by holding the alt key, you can now click any of the WASD directions again and it will instantly change to that direction.
Colour: If you would instead like to change it's colour, there's no need to hold alt at all, simply hover the cursor over the note and then middle mouse click.
Position on the grid: Whilst holding alt, simply drag a note around by holding left click on it.
Bombs
Placing bombs is dead simple. Either click the UI on the left, or click the number 3 on your keyboard. There's no need to worry about direction or the such with bombs, simply place them where you want on the grid.
Walls (Obstacles)
Walls are placed in a 3 step process. A click, a scroll, a click. Both clicks are within the vertical grid, but they are at different points in time (beats).
First, click the number 4 on your keyboard to select Wall mode.
Once selected, I want you to click the top left square of the vertical grid. You don't need to hold the click, just the single left click will do.
Once you have clicked, you should see a small part of the wall appear. If you now move your mouse around the grid you will see the how you can control the shape of the wall. Before left clicking to place the wall, we instead also need to determine it's length. If you simply use your scroll wheel to scroll ahead in time, you can distinguish it's length. Once you're happy with the length, then we can finalise it's shape and left click for the second time.
Done!
Modifying placed Walls
Length: If you have placed a wall but now want to refine it's length. Simply go into wall mode by clicking the number 4 on your keyboard, then hover your mouse over the wall. Now hold the alt key and use the scroll wheel of your mouse to extend/shorten the wall length. The wall which change length exact to the current beat subdivision. So if you would like to make shorter adjustments, then first change your beat subdivision.
Shape: A wall's shape cannot be modified after it is placed, you will have to delete the wall and replace it in the shape you are wanting.
Arcs
Placing an arc is simple, it's modifying it that can take a bit of practice.
First, determine what type of Arc you would like to place, as they come in a normal, and a tailless variation.
If you would like to place a normal arc, then the first step is to place 2 notes as you would any other notes, these notes will represent the start and end of your arc, so make sure they are also seperated by time (beats).
Once you have placed your 2 notes, lets switch over to arc mode by clicking T on the keyboard.
Before we place the arc, we need to determine it's direction. See, an arc will flow from one note to the next, but a lot of the time these 2 notes are at different angles. The arc doesn't automatically know if you'd prefer the player to swing in a clockwise or counter clockwise direction to get from one to the other.
So, we can choose 1 of 3 different direction. Clicking Q for counter clockwise, E for clockwise or R for straight. The straight direction will simply take the shortest path between the blocks without any curve. See the image on the right to see the different directions.
Once you've clicked the keyboard key corresponding to what direction you want, we now need to place the arc.
We need to put the playhead on the first note you placed, and now left click that note.
We then scroll so that the playhead is alligned with the secondary note, and left click this second note.
The arc is now placed! You should visually see the arc between the notes, and a little number 1 should have appeared next to both notes.
This number is a multiplier that is applied to the starting and ending curvature of the arc.
To modify it, simply hover your mouse over the note of the multiplier you want to modify, then hold the alt key and use the scroll wheel to adjust the number. You will see in real time the curvature of the arc change.
IF you want to instead place a tailless arc (an arc that has no secondary note), the process is very similar, but instead of placing 2 notes down at the start, we instead place 1.
Place the first note, then switch to arc mode, switch to the direction you want the arc to take, left click the note, then scroll the playhead to the beat you want the arc to end at. You can click on a blank area of the vertical grid, and a grey note will appear, with the arc between them. This grey note will not appear in the level, it is simply for visual purposes so that you can still modify the multiplier amongst other things.
Modifying placed Arcs
Note directions and grid space: The notes at the start and end of an Arc are modified just like normal notes. Hold the alt key and you can change their direction or position on the grid.
Rotation Directions: Hover your cursor over the note, hold the alt key and click Q, E or R to modify rotational direction to Counter Clockwise, Clockwise or straight respectively.
Multiplier: Hover your cursor over the note, hold the alt key and use the scroll wheel to modify the multiplier for the start/end curvature of the arc.
Colour: Modifying the colour of an arc is not the same as with a note, You will instead have to select both ends of the arc first and use 'mirroring' to change the colour. See the mirror section at the bottom for details.
Chains
Placing a chain is very similar to placing an Arc.
Place 2 notes down, though with a Chain, you can place 2 on the same beat, there is no necessity to have time difference between them.
Once placed, click G to switch to Chain mode.
Left click the first, and then the secondary note, and they will become a chain!
There are 2 numbers listed next to the leading note of the chain. They represent 'Squishiness' and 'Link count'.
Squishiness is the gap between each link in the chain. The entire chain can compress to become smaller, with all the links compressing towards the head of the chain, meaning the starting note/link of a chain will always be in the same spot regardless of squishiness.
Link count is how many links are in the chain.
To modify the link count, hover the cursor over the head note of the chain, and hold alt and us the scroll wheel. To modify the squishiness, hover the cursor over the head note of the chain, and hold alt AND shift, then use the scroll wheel.
Modifying placed Chains
Note directions and grid space: The notes at the start and end of an Chain are modified just like normal notes. Hold the alt key and you can change their direction or position on the grid. Though do note, the direction of the tail note in a chain has no use, only the direction of the head note will have an impact on the curvature of the chain.
Link Count: Hover the cursor over the head note of the chain, and hold alt and us the scroll wheel.
Squishiness: Hover the cursor over the head note of the chain, and hold alt AND shift, then use the scroll wheel.
Colour: Modifying the colour of a chain is not the same as with a note, You will instead have to select both ends of the chain first and use 'mirroring' to change the colour. See the mirror section at the bottom for details.
Modifying placed Chains
To Select any of the mentioned objects above, there are 3 methods to do so.
Either
1 - Hold shift and individually left click on each note/wall, etc that you would like to change.
2 - Hold shift and hold left click to drag a box over a range of objects (like dragging a square around icons on the desktop of a computer)
3 - Hold Ctrl + alt, then left click any object. Let go of Ctrl and Alt, now scroll all the way up to another object and left click it. All objects between these 2 points will be selected.
Once things are selected, there are a few things that can be done to them.
In the central lower area of the UI, you will see a new little grey window that has appeared showing you what has been selected, you can use the buttons in here to do some things including delete all, mirror (which mirrors all objects from left to right, including changing their colour) - This is the method on how to change colour of a placed arc or chain.
You can move selected objects around the grid together by holding the alt key and using the arrow keys on the keyboard.
You can move selected objects forward and backward in time by holding the alt and the shift key together, and then using the up and down arrows on the keyboard.
You can also cut, copy and paste with ctrl + X, C and V respectively.
Once you've done modifying your selected objects, click Ctrl + A to de-select everything.
Additional tips and tricks.
You can quickly move individual notes, bombs, arcs and chains to other points in time by first moving the playhead to the beat you want the note to move too, whilst the note is still visible on the screen at it's other beat. Now, hold alt, then hold left click on the note, and move the cursor a bit. The note will suddenly move to the grid at the playhead's location.
When first entering the Main Editor Interface, you will immediately be in 'Note mode' which is where we place blocks/obstacles and bombs. The surrounding UI can look a bit intimidating. I recommend going through the table on the right side alongside with the image to get a feeling what each thing does. The most useful thing in the interface for those starting out is the red box on the left. It will take time to get use to the keyboard shortcuts for all the different elements and blocks that can be placed. The left side of the UI allows you to simply use your mouse to change between the different block types.
The bottom of the UI also has a bunch of sliders and things that can be adjusted for your own comfort. You can adjust volumes as well as scale the bridge and even speed the song up and down. Every time you load a song these values are set to defaults so if you somehow find yourself changing a setting that you don't know how to undo, backing out to the song info screen then reloading the map will bring you back to known ground.
The top left of the UI contains a big play button and some tick boxes. Familiarise yourself with what these do in the table to the right, but ultimately this button is for when you're ready to play your song.
Below is the control scheme for when you are in this part of the editor.
If you have accidentally switched to a different mode than Note mode, Using the F1 hotkey will return you.